Thursday, January 31, 2013
BAW 52/4
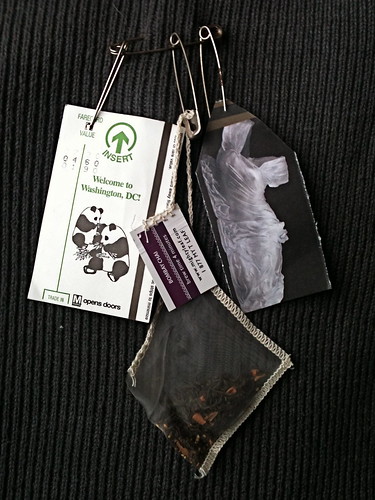
I went to Washington DC this past weekend to visit with my cousin who was there for the inauguration (!). In addition to my visit to the Renwick Gallery to see the '40 Under 40' exhibit and that wonderful glass dress by Karen La Monte - I had a chance to visit congress (not in session) and the senate (talking about the immigration bill). I'd been there when I was little girl, and more recently to a craft show with a good friend, but I'd never had the chance to explore the city on foot, use the Metro, and stay in the heart of the city (Dupont Circle). Even with three days under my belt - I know I only scratched the surface. Can't wait to go back!
Friday, January 25, 2013
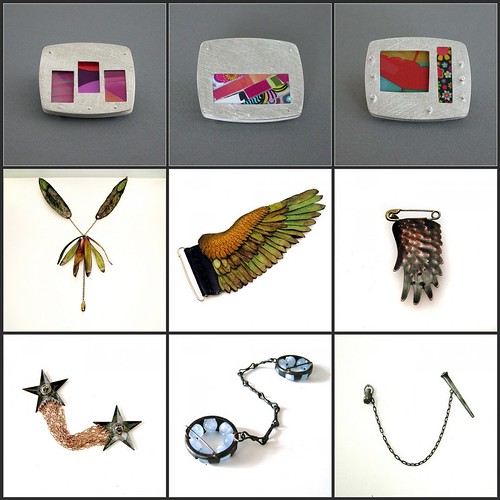
Brooches Week Three - Multiples
This week I'm struck by how the use of repetition in design can lead to progressive experimentation - as in Victoria Takahashi's use of leaves, then wings made of leaves, to wings made in copper; or create a line of colorful brooches that would display beautifully together - like Stacey Maddock's greeting card and sterling pins; or allow for an exploration of materials - such as with Shae Freeman's sweater pins.
Monday, January 21, 2013
BAW 52/3
Well, it looks like I'm continuing on with the fibula obsession. This week I took direct inspiration from Mark Nelson's video, and the 2nd inauguration of our 44th President.
I started by opening a 'Word' document and sampling a variety of fonts. I decided to use the 48 point, number 4 and affixed it to a piece of 18g brass sheet with a glue stick. Next a #3/0 saw blade pierced the two 4's, the oval, and the two long 'sticks' out of the brass. After filing and sanding the perimeter of the oval and interior of the numbers, I forged the long 'stick' into a roundish shape and filed it into a perfectly round wire!
Then I curled the long wire into a double loop, trimmed and shaped the pin catch, and voila! A fibula! I absolutely don't consider myself any sort of real fabricator. I dabble in hard metal work (as opposed to malleable metal clay). So I'm pretty impressed with the fact that I did this on my own - not in a class. I love learning a new technique.
I'll give you a few pointers if you decide to try your hand at a similar design.
1. Use rubber cement instead of glue stick if you need to glue a paper guide to the metal in order to pierce an intricate design. The paper kept releasing from the metal in my project and I had to both reapply the glue and hold the paper in place with my thumb as I sawed. You could also scribe the outside shape with a compass, instead of using a paper facsimile, as the video suggests.
2. To provide stability as you work, pierce the interior designs before sawing the outside shape.
3. To make a perfectly sharp corner, put gentle pressure on the back of the saw bade as you move it up and down in place, to turn the corner. When it's facing the correct direction, change the pressure to the front teeth of the blade and continue sawing forward.
4. Use a fishhook sharpener to refine the taper on the pin stem, or file a taper into your bench pin to sharpen the end of the wire. A few passes with a flat file, while turning the wire, will create a nice thin, sharp pin stem.
5. Take care which side of the brooch gets the longer wire. Most pins and brooches are designed for right handed people. A right handed person inserts the wire into the cloth from right to left, which means the pin stem should be on the left side of the brooch as you look down on it. All three of my fibulas work better for a left handed person and are kind of fussy for me to put on. Hopefully the third time will be the charm, and my next brooch will face the 'right' way.
6. Be careful how short you make the catch. The first two fibula's worked perfectly, but I cut the wire for the catch too short this time and the pin stem rests at an awkward angle when I close it.
Trying new techniques is a great way to stretch your imagination and spark the fire of creativity. Why don't you try to do something that is outside of your usual modus operandi?
Friday, January 18, 2013
Weekend Eye Candy - Brooch a Week 52/2 Edition
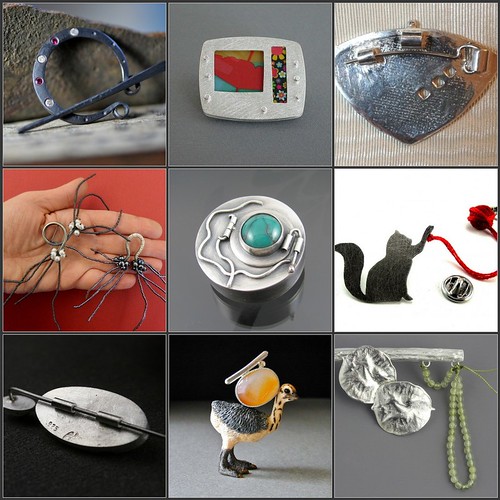
1. pennanular brooch in sterling silver with ruby and diamond flush set, 2. BAW52/1, 3. PMC3_Brooch_2_back_ivory, 4. BAW3/52, 5. BAD12 vine locket, 6. Brooch a Day 10/365 ... Brooch a Week 2/52, 7. www.flickr.com/photos/27303783@N07/8373595916/in/pool-210..., 8. BAW52/2 druzy agate, sterling, 14kt gold Brooch, 9. BAW1 - First brooch in Brooch a Week project!
Week two and the pins are only getting better and better. These are all from the Brooch a Week group. I love the way some of them combine found objects with fine metal work. So whimsical and clever. It's not to late for you to join in the fun, you know!
Monday, January 14, 2013
BAW 52/2
I enjoyed making last week's simple, fibula, safety-pin so much that I thought I'd try my hand at forging a real fibula design. I saw a link to a post by a master Fred Zweig on Pinterest that was my initial inspiration, then went to YouTube to see if I could find a good video tutorial to augment what I learned in a fold forming class with Robert Dancik many years ago. To my amazement, I could only find two that directly dealt with making fibula's! Both by Mark Nelson of Rio Grande. Also both produced by Beads, Baubles, and Jewels. One worked with wire an the other one with sheet metal. Neither were exactly what I was looking for, but I utilized bits and pieces of information from both to create my brooch.
I'm really happy with the way it turned out for a first try, but I know I need to practice, practice, practice some more to make something that even approaches the beauty of Fred's examples. I started with 14g wire and forged the end that was to be the pin stem down to about 17g. I think I need a bigger bench block (mine is 4" square) or an anvil. I'm also not sure I was using the correct hammers. I used ball, riveting, and slightly domed planishing hammers to thin and move the metal. Files and 3M sanding pads smoothed out the hammer dimples, and a Pro Polish pad shined it up. My tumbler needs a new o-ring, so no tumble finish for me! Although I tried to use pliers to achieve the lovely undulating effect that Fred used in his designs, I think there's more technique involved than I can imagine. So instead I decided to add the lentil pendant before I forged the catch and bent it into position.
Maybe next week I'll attempt the sheet metal version of Mark's. Wonder what would happen if I tried to forge sterling clay??? Hmmm...
 |
| Before forging and bending the pin catch |
I'm really happy with the way it turned out for a first try, but I know I need to practice, practice, practice some more to make something that even approaches the beauty of Fred's examples. I started with 14g wire and forged the end that was to be the pin stem down to about 17g. I think I need a bigger bench block (mine is 4" square) or an anvil. I'm also not sure I was using the correct hammers. I used ball, riveting, and slightly domed planishing hammers to thin and move the metal. Files and 3M sanding pads smoothed out the hammer dimples, and a Pro Polish pad shined it up. My tumbler needs a new o-ring, so no tumble finish for me! Although I tried to use pliers to achieve the lovely undulating effect that Fred used in his designs, I think there's more technique involved than I can imagine. So instead I decided to add the lentil pendant before I forged the catch and bent it into position.
Maybe next week I'll attempt the sheet metal version of Mark's. Wonder what would happen if I tried to forge sterling clay??? Hmmm...
Friday, January 11, 2013
Weekend Eye Candy - Brooch a Week 52/1 Edition
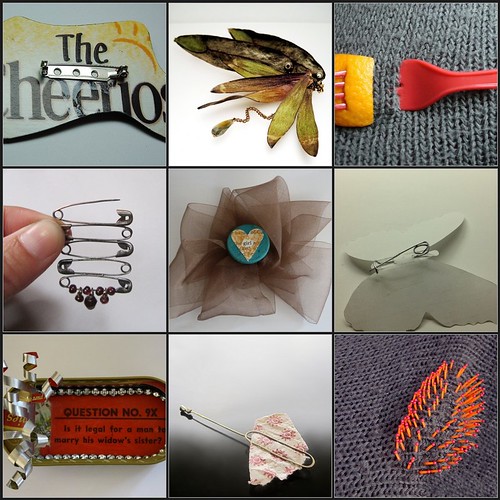
These were all made by members of the Brooch a Day group. With 365 pins to make over the next year, using precious materials for each offering would not only be expensive, but time consuming. Using disposable materials gave each artist the freedom to experiment and just have fun.
Wednesday, January 9, 2013
BAW 52/1
Well, I've done it again. I'm starting out the New Year intending to make a piece of jewelry a week and post it in a Flickr group. This time the Etsy Metal team has invented the Brooch a Week challenge. There are even some dedicated artists who are making a Brooch a Day! Now that's a challenge.
I mean to post my creations here every Monday. I was feeling a little under the weather this week, so I'm late. Oh well. Such is life.
I began with high hopes of a fabricated stick pin using elements I already had in my studio. I bought the fun ceramic eye bead years ago on Etsy, and wanted to make my own Victorian lover's eye brooch. The bezel was cut, fitted, and soldered uneventfully - but when it came to soldering the the bezel to the backing... well, you can see what happened. For many reasons that I won't go into. Let's just say it was operator error and move on, shall we?
After deciding to put it aside for another day - my eye fell on a textured piece of Creative Paper Clay that I made almost exactly a year ago in the studio of Miss Lorena Angulo. Ah! Perfection. I added some glass seed beads, embellished with oil pastels, forged a simple fibula pin, and sewed it all together with silk cord. And I love it!
Tips for making a fibula pin:
1. Watch a YouTube video to refresh your memory
2. Forge the wire to thin and lengthen it (something I hadn't done in the past)
3. File the hammer marks with a bastard from the hardware store (no, not the salesman)
4. File the file marks with a needle file
5. Sand the needle file marks with sandpaper
6. Hammer the other end into a paddle shape to act as the catch
7. Bend to fit
8. Polish
This is the nicest pin stem I have ever sharpened. The others started with wire, followed by lots of filing and swearing. It's the forging first that's the secret! Finished it in about 5 minutes.
I have no idea what I'll do next week, but I'm looking forward to it. Wouldn't you love to join me?
I mean to post my creations here every Monday. I was feeling a little under the weather this week, so I'm late. Oh well. Such is life.
I began with high hopes of a fabricated stick pin using elements I already had in my studio. I bought the fun ceramic eye bead years ago on Etsy, and wanted to make my own Victorian lover's eye brooch. The bezel was cut, fitted, and soldered uneventfully - but when it came to soldering the the bezel to the backing... well, you can see what happened. For many reasons that I won't go into. Let's just say it was operator error and move on, shall we?
After deciding to put it aside for another day - my eye fell on a textured piece of Creative Paper Clay that I made almost exactly a year ago in the studio of Miss Lorena Angulo. Ah! Perfection. I added some glass seed beads, embellished with oil pastels, forged a simple fibula pin, and sewed it all together with silk cord. And I love it!
 |
| Shot with my iPhone on black foam. Not the best surface. |
Tips for making a fibula pin:
1. Watch a YouTube video to refresh your memory
2. Forge the wire to thin and lengthen it (something I hadn't done in the past)
3. File the hammer marks with a bastard from the hardware store (no, not the salesman)
4. File the file marks with a needle file
5. Sand the needle file marks with sandpaper
6. Hammer the other end into a paddle shape to act as the catch
7. Bend to fit
8. Polish
This is the nicest pin stem I have ever sharpened. The others started with wire, followed by lots of filing and swearing. It's the forging first that's the secret! Finished it in about 5 minutes.
I have no idea what I'll do next week, but I'm looking forward to it. Wouldn't you love to join me?
Thursday, January 3, 2013
New Year, New You (And Renewed Me)
I have many plans swirling around my brain. I'm designing new classes that I'd love to teach around the country, making samples for the new and improved certification projects, experimenting with combining porcelain clay and metal clay, and re-invigorating the Mentorial program that I designed in 2010.
I'm so proud to have been able to help artists from around the world raise the bar on their own artistic practice. I really enjoy the one on one interaction, brainstorming together to find solutions to each maker's particular concerns. I'd be honored to be able to guide you as you transition from your current path to a more complete vision of your creative business. Whether you need help discovering your unique artistic voice, want to begin teaching, need help navigating the craft show scene, want to explore other methods of production to add to your creative tool box, or are considering scaling up any other aspect of your art - I'd love to mentor your journey.
The method and frequency of our relationship is up to you. Voice to voice, face to face Skype meetings allow us to share work in progress and brainstorm in real time, while in-depth, written communications via Etsy's Convo system provide more time for thoughtful consideration and the ability to go back and review our discussions in a detailed manner.
Being able to choose exactly what you want to work on, how long you want to spend on each aspect of your business, and exactly when you want to meet is a very organic way of working, and the affordability just can't be beat.
Please let me know if I can help you realize your dreams. Feel free to e-mail for a free consultation. Here's to a wonderfully creative and fulfilling 2013 to all! Thank You for reading.
Subscribe to:
Comments (Atom)


