Well, the week just got away from me. No posts, no brooches, no eye candy. But I wrote an article for the next Metal Clay Artist Magazine, shredded receipts from 2004 and on, and am now getting ready to travel to Baltimore to check out the American Craft Council (ACC) show with Vickie Hallmark, Cindy Silas, and Donna Penoyer.
The ACC show is a high end craft show, with both wholesale and retail days. We'll be going to the retail portion. I don't think I'll buy anything, but there will be lots to drool over. Hope you have an inspirational weekend!

Friday, February 22, 2013


Monday, February 11, 2013
BAW 52/6
Feeling a little under the weather. I promise a real brooch next week.
 |
| Kawp Owt. Found objects. |
It's the dedication and the commitment that counts sometimes. ;)
Friday, February 8, 2013
BAW 52/5
I can't believe I didn't post last week's brooch, so in lieu of the usual Weekend Eye Candy, I'm rectifying that oversight.

I quite enjoyed using a jewelry saw to pierce the 44 in last week's offering, so I decided to continue the exercise with a little football in honor of the Super Bowl. The piece of metal I chose to use was 17 gauge copper that had the most beautiful naturally aged patina, which reminded me of a mottled pigskin ball. I snapped 7 saw blades piercing out the roman numerals, and then broke two drill bits when making the holes for the laces. I wanted to use very thin wire, which required small drill bits, which were probably not hefty enough to survive the trip through 17 gauge metal. Drat! To remove the bits from the holes, I needed to dissolve the steel with an Alum/water solution. Which I also use as a pickle. Which means that it removed my beautiful patina. But it also removed the broken drill tip - so bonus! (The recipe is 2 parts Alum - which you find in the grocery store, spice aisle - to one part water. I had to do it twice. The process is faster if you heat the water. Much like pickle.)

My design included using a single piece of copper wire (which I knew to begin with is NOT a hard enough metal for a pin stem) to act both as the ball's seam and the pin mechanism. Then 22g fine silver wire was used to replicate the lacings. Which look an absolute mess on the back of the brooch. I don't know how wire weavers create such tight, straight, beautiful looking weaves!
But the front looks almost exactly how I first imagined it. I forgot to texture the football portion of the brass (it turns out, after pickling, that the beautiful patina was actually on a piece of brass, not copper), but I'm still pleased with my learning experience and the final brooch.
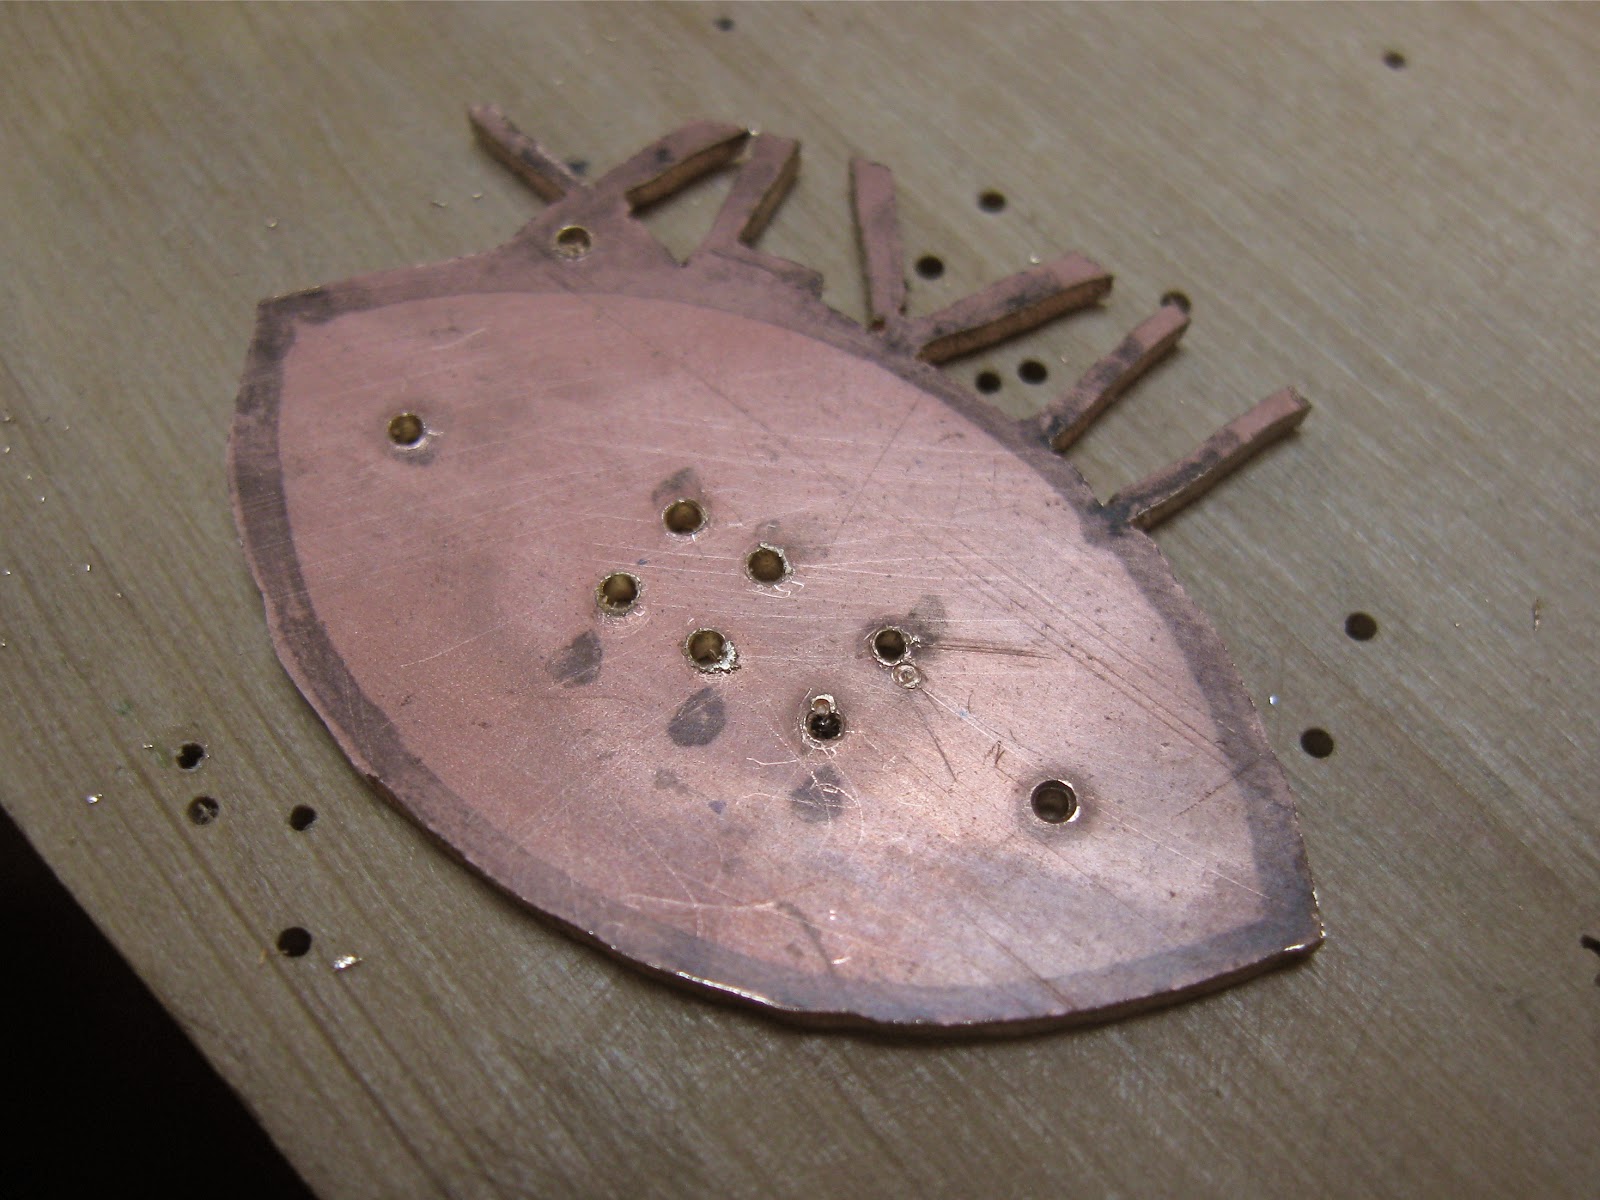
I quite enjoyed using a jewelry saw to pierce the 44 in last week's offering, so I decided to continue the exercise with a little football in honor of the Super Bowl. The piece of metal I chose to use was 17 gauge copper that had the most beautiful naturally aged patina, which reminded me of a mottled pigskin ball. I snapped 7 saw blades piercing out the roman numerals, and then broke two drill bits when making the holes for the laces. I wanted to use very thin wire, which required small drill bits, which were probably not hefty enough to survive the trip through 17 gauge metal. Drat! To remove the bits from the holes, I needed to dissolve the steel with an Alum/water solution. Which I also use as a pickle. Which means that it removed my beautiful patina. But it also removed the broken drill tip - so bonus! (The recipe is 2 parts Alum - which you find in the grocery store, spice aisle - to one part water. I had to do it twice. The process is faster if you heat the water. Much like pickle.)

My design included using a single piece of copper wire (which I knew to begin with is NOT a hard enough metal for a pin stem) to act both as the ball's seam and the pin mechanism. Then 22g fine silver wire was used to replicate the lacings. Which look an absolute mess on the back of the brooch. I don't know how wire weavers create such tight, straight, beautiful looking weaves!
 |
| You can see that the turns in my piercing still need a lot of practice. Too many round cut out dots where there should be sharp corners. |
But the front looks almost exactly how I first imagined it. I forgot to texture the football portion of the brass (it turns out, after pickling, that the beautiful patina was actually on a piece of brass, not copper), but I'm still pleased with my learning experience and the final brooch.
Saturday, February 2, 2013
Weekend Eye Candy - BAW Wire Edition
Look at what beautiful things can be made with a simple length of wire. The Brooch A Day artists are so imaginative!

Thursday, January 31, 2013
BAW 52/4

'Traveler's Chatelain', Mixed Media.
Friday, January 25, 2013
Brooches Week Three - Multiples
This week I'm struck by how the use of repetition in design can lead to progressive experimentation - as in Victoria Takahashi's use of leaves, then wings made of leaves, to wings made in copper; or create a line of colorful brooches that would display beautifully together - like Stacey Maddock's greeting card and sterling pins; or allow for an exploration of materials - such as with Shae Freeman's sweater pins.

Monday, January 21, 2013
BAW 52/3
Well, it looks like I'm continuing on with the fibula obsession. This week I took direct inspiration from Mark Nelson's video, and the 2nd inauguration of our 44th President.
I started by opening a 'Word' document and sampling a variety of fonts. I decided to use the 48 point, number 4 and affixed it to a piece of 18g brass sheet with a glue stick. Next a #3/0 saw blade pierced the two 4's, the oval, and the two long 'sticks' out of the brass. After filing and sanding the perimeter of the oval and interior of the numbers, I forged the long 'stick' into a roundish shape and filed it into a perfectly round wire!

Then I curled the long wire into a double loop, trimmed and shaped the pin catch, and voila! A fibula! I absolutely don't consider myself any sort of real fabricator. I dabble in hard metal work (as opposed to malleable metal clay). So I'm pretty impressed with the fact that I did this on my own - not in a class. I love learning a new technique.
I'll give you a few pointers if you decide to try your hand at a similar design.
1. Use rubber cement instead of glue stick if you need to glue a paper guide to the metal in order to pierce an intricate design. The paper kept releasing from the metal in my project and I had to both reapply the glue and hold the paper in place with my thumb as I sawed. You could also scribe the outside shape with a compass, instead of using a paper facsimile, as the video suggests.
2. To provide stability as you work, pierce the interior designs before sawing the outside shape.
3. To make a perfectly sharp corner, put gentle pressure on the back of the saw bade as you move it up and down in place, to turn the corner. When it's facing the correct direction, change the pressure to the front teeth of the blade and continue sawing forward.
4. Use a fishhook sharpener to refine the taper on the pin stem, or file a taper into your bench pin to sharpen the end of the wire. A few passes with a flat file, while turning the wire, will create a nice thin, sharp pin stem.
5. Take care which side of the brooch gets the longer wire. Most pins and brooches are designed for right handed people. A right handed person inserts the wire into the cloth from right to left, which means the pin stem should be on the left side of the brooch as you look down on it. All three of my fibulas work better for a left handed person and are kind of fussy for me to put on. Hopefully the third time will be the charm, and my next brooch will face the 'right' way.
6. Be careful how short you make the catch. The first two fibula's worked perfectly, but I cut the wire for the catch too short this time and the pin stem rests at an awkward angle when I close it.
Trying new techniques is a great way to stretch your imagination and spark the fire of creativity. Why don't you try to do something that is outside of your usual modus operandi?
I started by opening a 'Word' document and sampling a variety of fonts. I decided to use the 48 point, number 4 and affixed it to a piece of 18g brass sheet with a glue stick. Next a #3/0 saw blade pierced the two 4's, the oval, and the two long 'sticks' out of the brass. After filing and sanding the perimeter of the oval and interior of the numbers, I forged the long 'stick' into a roundish shape and filed it into a perfectly round wire!

Then I curled the long wire into a double loop, trimmed and shaped the pin catch, and voila! A fibula! I absolutely don't consider myself any sort of real fabricator. I dabble in hard metal work (as opposed to malleable metal clay). So I'm pretty impressed with the fact that I did this on my own - not in a class. I love learning a new technique.
I'll give you a few pointers if you decide to try your hand at a similar design.
1. Use rubber cement instead of glue stick if you need to glue a paper guide to the metal in order to pierce an intricate design. The paper kept releasing from the metal in my project and I had to both reapply the glue and hold the paper in place with my thumb as I sawed. You could also scribe the outside shape with a compass, instead of using a paper facsimile, as the video suggests.
2. To provide stability as you work, pierce the interior designs before sawing the outside shape.
3. To make a perfectly sharp corner, put gentle pressure on the back of the saw bade as you move it up and down in place, to turn the corner. When it's facing the correct direction, change the pressure to the front teeth of the blade and continue sawing forward.
4. Use a fishhook sharpener to refine the taper on the pin stem, or file a taper into your bench pin to sharpen the end of the wire. A few passes with a flat file, while turning the wire, will create a nice thin, sharp pin stem.
5. Take care which side of the brooch gets the longer wire. Most pins and brooches are designed for right handed people. A right handed person inserts the wire into the cloth from right to left, which means the pin stem should be on the left side of the brooch as you look down on it. All three of my fibulas work better for a left handed person and are kind of fussy for me to put on. Hopefully the third time will be the charm, and my next brooch will face the 'right' way.
6. Be careful how short you make the catch. The first two fibula's worked perfectly, but I cut the wire for the catch too short this time and the pin stem rests at an awkward angle when I close it.
Trying new techniques is a great way to stretch your imagination and spark the fire of creativity. Why don't you try to do something that is outside of your usual modus operandi?
Subscribe to:
Posts (Atom)