Monday, December 31, 2012

New Year's Eye Candy

Wishing you all new experiences, new and renewed friendships, new surroundings, new vistas, new inspirations, and renewed dedication to that which is most important to you.

Thank you so much for reading my blog, supporting my efforts, and being a friend in my corner of cyber space.

Tuesday, December 18, 2012

Planning Makes Perfect


Last week, I wanted to create a sample for a new class. I always base my class projects on the techniques they'll make use of - and let my students put their own spin on the design. Likewise I like to reveal my own artistic voice in every piece of metal clay or traditional jewelry work *I* produce. For this project the techniques I wanted to include were 1. a template for a custom bail 2. a cabochon set with milled bezel wire 3. a two-part firing for the pendant (once for the pendant base and again for the addition of the bezel wire) 4. a riveted element.

Starting with those parameters, I wanted to make a piece that displayed my creative vocabulary and could easily be identified as my work. Often times as teachers, we want to make samples that are universally appealing and that our students can identify with. This attitude sometimes translates our intention into a jewel that is beautiful - but nondescript. One of my core beliefs as an instructor and artist is that it's always possible to produce an item that looks unique to the maker, even when one is taking a class or following a set of specific instructions.

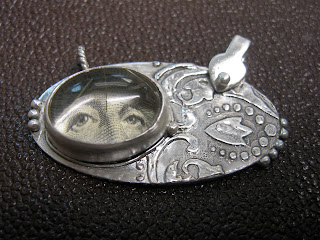
I decided to sketch a few ideas before breaking out the clay - an unusual method for me to take. Usually I open a new package of my favorite material to just see where it takes me. But this time I wanted to be more mindful and explore various ways to "get the job done." I knew I wanted to include a number of my go-to design choices - namely slip printing, a double 'mickey mouse ear' style hanging mechanism, and an historical element (this time a wink to Victorian Lover's Eye jewelry).

'Legally Tender'
I bought a quantity of clear quartz cabochons at the 2010 PMC Conference with the intent of setting them over interesting or colorful objects. I've used the quartz to magnify handmade felt, a small out-of-focus picture of my Mother, and a piece of gilded leather torn from an old jewelry box. This time I used a common object that every one of you has in your wallets right now! Can you guess who's behind the quartz?

I'm very pleased with the way my sample came out. You can see that I'm not a skilled fine artist. My drawings/sketches are very rudimentary - but they helped me refine the nebulous idea I had in mind, and even gave me a few options for future designs. Next step? Hanging it of course! I'm imagining a few different chain assemblages that will compliment the materials used and style of the design. Perhaps I should continue in the same vein and sketch a few variations on my theme.

Friday, November 30, 2012

Weekend Eye Candy - Twig Edition

This weekend I'm teaching a class at the Visual Arts Center in Richmond. I'll show my students how to use a silicone mold material to make replicas of twigs and leaves.

These are all such beautiful examples of how natures jewels make the best models. Have a great weekend!

Friday, November 23, 2012

Weekend Eye Candy - Thanksgiving 2012 Edition

Thank you so much for your friendship, your readership, your support, and the honor of blogging for you.

May you all survive the post Thanksgiving feast with health, enter the new year with joy, and celebrate your gifts every day.

Wednesday, November 14, 2012

Sneak Peek

"French" style earwires are
soldered to the back of the
focal in this basic example.
The wonderful Senior Instructors of PMC Connection are hard at work re imagining the Level 2 projects. Level 1 was updated last spring and Level 3 is not far away.

With only two projects, this certification workshop will inspire artists to inject their own personality and creative voice into a pair of earrings and a pendant. The bonus is that the time allowed for each design will enable the student to work at a much more comfortable pace than in the past.

A more complex design
may include multiple jump
rings and post earring backs.
Each Sr. Instructor is making samples, taking notes on their construction, and sharing their findings. We'll work and re work the criteria until we think the techniques taught in each project will cover a variety of new skills that will inspire our students to produce uniquely personal, and professional looking jewelry.

First up (for me) - Burr set gemstone, pierced earrings with original textures. This project involved designing and creating an original texture sheet, setting faceted stones in unfired clay using a gem setting burr, and soldering. In addition you'll learn how to measure stones and roll clay to the corresponding thickness, use some traditional metal working tools, and perhaps work with a flexible shaft machine.

Students who have previous experience in any of the techniques taught will have a free hand to make more complicated designs, include more solder joins, use hollow construction or doming techniques, or customize their designs in any way. If the class will be your first introduction to these skills, you'll be encouraged to 'Keep it Simple Sweetheart'.

Tomorrow I'm going  back into the studio to start on the twice fired, bezel set, cabochon pendant exemplars. We're hoping to roll out the new edition of the Level 2 program very early next year. I can't wait!


Monday, November 12, 2012

Studio V2.0

After settling in to my lovely new studio space, an opportunity arose in the same artist's co-op to move into new digs that would include use of a common teaching area. Of course I had to jump on it! I had almost finished setting up when it was time to tear it all apart again and re locate into two (of 7) smaller studios that are clustered around an 8 person work table. Actually the move wasn't all that horrendous. I piled the contents of a shelving unit onto a rolling cart, rolled said cart a few hundred feet to the new space, downloaded the supplies onto the common table, moved the shelving unit, re stocked the shelves, and repeated about 10 times until everything was re-situated.

Original space

Now I have a separate room for supplies and teaching equipment, and another for clay work and soldering. And I just love it. It feels so much cozier in the smaller unit, and I can just roll my chair around to move from station to station. This studio is very different from the one in my tiny apartment in LA. There I had to keep almost all of my tools and supplies in drawers because there wasn't enough room to spread them around and let them lay. And I didn't want my living space to look too messy. Here I have an entire 'bench' (Ikea table) to dedicate to sawing, soldering, and use of the Foredom. I get to keep my vise and bench pin clamped to the table, instead of putting them away after each use and never have to worry about tiny pumice stones jumping out of the lazy-susan pan and ending up in a kitty's tummy.

1. The conference table points directly to my window. 2. My clay/computer desk
is situated in front of the window. 3. The soldering and metal work bench is located
against the back wall. The kiln *may* move to the storage room, and the 20 drawer
unit was found on Craigslist for 20 bucks! 4. My storage studio has room for a couple
more tables, perhaps for the kiln, a soon to be purchased belt sander, and definitely
the very loud vibe tumbler. The wall was already painted when I took custody.
The only possible negatives to this arrangement are that: 1. There's no way to vent fumes to the outside in this internal, cinder block, room so I'm going to get a small venting fan from Rio for when I'm soldering and I'll run the kiln as I leave for the day so the nastiness can dissipate during the night. 2. The common table is available to other folks, for instance the three lovely people who have been having an actual conference while I've been typing this, or the kids ceramic class that meets here 2 Saturdays a month. But I can schedule as many days with the table as I like and most of the time it's pretty quiet around here. And I'm right next to the cafe (nom nom)! I can deal with the tiny inconveniences for a set up like this.

Friday, November 9, 2012

Weekend Eye Candy - Clasp Edition

I can't believe it's Friday already! All week I've been working on changing studios (yes, again); making samples for the new PMCC Level Two certification projects; and trying to keep warm. Hopefully there will be pictures and a post next week.

Have a good one y'all!


Wednesday, October 31, 2012

Steeling Beauty

Sarah Loertscher

This past weekend I took a class at the Visual Arts Center here in Richmond, where I also teach. 'Steel Fabrication for Jewelers' was taught by the very talented Sarah Loertscher. Sarah demonstrated a plethora of techniques, of which I attempted two designs. And true to my modus operandi - didn't complete.

My lovely chain. Somtimes I used just the right amount of solder
and sometimes I got lazy and cut too big a piece.

We used plain ol' mild steel binding wire from the hardware store to form jump rings to be made into chain or bracelets or whatever we could dream up. I really loved this project for a variety of reasons. First and foremost - I'm not at alllll ambidextrous and have always babied myself by holding the torch in my dominant hand, switching at the last minute when I needed to use a soldering pick. This is a big no-no in the metal working process. So this time I 'forced' myself to put the torch in my left hand and hold the pick with my right! And by the end of the day, I almost had the technique down pat. Almost. Sarah showed us a great trick to help steady a shaky non dominant hand. By using the pick to guide the torch tip just at the bend of the nozzle I had almost as much control as if I were using my right hand to control the flame. I'll be practicing this technique more, until I perfect it.

These modified rings would be great chain 'stations' or post earring elements.
The half ring is held in place with a third hand while soldering.

Sarah uses black welder's flux called 'Stay Silv' most often when soldering steel, but admits that traditional, white, 'Handi Flux' works too, it just doesn't offer as much working time as black flux does. There's no specific solder for steel, so we used medium silver solder (you can, of course, also use the beautiful but spendy 18K gold solder if you wish).  We bridged our work over two firing bricks, so that we could get the flame under the seams and draw the solder down. A metal tripod would have been too much of a heat sink.

Rachel Rader's line of jump rings turned bangle bracelet.

On Saturday we learned to saw mild or stainless steel sheet to make other elements.  Never use good tools on steel! Sheet metal cutters (guillotine sheers and the like) will dull and get chewed up by steel. Also keep steel away from a rolling mill for the same reasons. We used a #3 blade to cut our small squares of metal. Sarah had to take the big sheets she had brought to the university to cut into sample sizes for us. You could ask your vendor to cut the sheet, but there would most likely be a charge for this service. Mild steel is easier to saw and to solder, but stainless is... well... stainless. So it doesn't tarnish or rust as easily. The emphasis in on stain LESS, not stain free. Use a sealant like Renaissance Wax or a similar product to protect the surface of mild steel for about a year or so.

My slotted earrings. Well, they're almost earrings. Any day now...

We learned how to use slots to build dimension into our work, score a line with a triangle or square file to make a sharp bend, do solder inlay,  place oxidized work in muriatic acid (get it at the hardware store)  for a super fast pickle clean up, use both heat and gun bluing for patina, and to use Super Sunsheen Polishing liquid in the tumbler to condition not only the shot, but the finished jewelry. Sarah has some mild steel pieces that haven't rusted in over a year when tumbled with Super Sunsheen.

Class samples. Notice the little blue rectangle on the 2nd sheet of paper?
That's silver solder inlay in mild steel with gun bluing patina.

Thanks for a great class Sarah! It was a wonderful 3 day treat.

Friday, October 26, 2012

Weekend Eye Candy -Steel Edition

This weekend I'll be taking a steel jewelry class. The photo in the catalog is of a pair of earrings, so maybe that's what I'll come home with. We'll be learning how to solder on steel, which is very different (and more difficult) than soldering silver or copper. Exciting!

Then on Sunday I'm going up to DC to see the Smithsonian's Craft2Wear exhibition with Cindy Silas where we'll meet up with Jeannette LeBlanc as she helps her friend Kathleen Nowak Tucci man her booth.

Have a great and creative weeked!

Friday, October 12, 2012

Weekend Eye Candy - Leaf Edition

It's that time of year again. Now that I'm in the east, I can actually see the leaves change. There were a few trees in LA that developed some color, but nothing like I'm expecting this year.

One of the greatest things about artists is how they each interpret a theme differently. All leaves, All unique. Here are examples of chasing and repousé, forging, carving, slip painting, piercing, soldering, and gluing; using steel wire, silver wire, resin, natural leaves, wood, sterling, metal clay, gold, and iron. Styles are simple, complicated, modern, gothic, realistic, and interpretive. And all are beautiful.

Monday, October 8, 2012

The Times, They Are A-Changin'...

Fall is has arrived in Richmond! The trees are just starting to blush, the days are darker a little earlier, and today I wanted to turn on the heat. If I were still in LA, I'd think it was January. That's how (not really) cold it gets in Southern California.

Ella under cover

My iPhone tells me it's 46º with an expected high of 55º. Brrr.... Definitely sweater weather. Maybe even a light jacket. If I owned one. Until I can get to the store I'll just layer like I did in Venice. The kitties don't seem to mind the cooler weather much. Diego was curled up on the bed when I got back from breakfast, and Ella is firmly ensconced under the covers. A new trick I think she's really enjoying.

Diego cuddling on my arms as I type

I tried turning on the heat, just to warm things up a bit, but I'm not sure it's working. Sigh. The joys of living in a 1928 building. Until I figure out the furnace, I'm very happy to have my old sheepskin lined Merrells on hand to keep my toesies cozy.

Friday, October 5, 2012

Weekend Eye Candy - Back Edition

In honor of Lorena Angulo's wonderful exhibition "Behind the Brooch" on Crafthaus and the fact that I have been dealing with nasty back pain for about a week, I did this week's search using the word 'back'.

Hope you all have a creative and pain free weekend.

Tuesday, October 2, 2012

Stu, Stu, Studio!

My new shop is still a work in progress, but I wanted to share it's humble beginnings with you. My first off site work space is located in a wonderful old industrial building that has been re-imagined as an artists studio cooperative called Artworks in Richmond Virginia, about 4 miles from my apartment. And I've gotta say - the lack of cat hair, kitties wanting to be cuddled, mindless tv noise (always on for company), comfortable couch singing like a siren - makes it a very attractive place to go in the morning. Me likey!

'12 Studiolo by lorahart

Yesterday I chose to bring the computer so I could get some writing done. Blog posts for CornerStone, an article for MCAM, teaching proposals, etc. And as always I had Skype open while I was working, so Miss Vickie was able to find me. We generally talk every day for a half hour or so, but it was such a lovely surprise to talk to her in my studio.
I've had a hard time really getting started back in my metal clay habit. Too many distractions in the past few months, and as we parted,Vickie encouraged me to make just 'one little thing'. Perhaps a jump ring. ;)

I remembered that I needed 'something to torch fire' for a class demo on Saturday, so I pulled out the clay to make a couple of earring components, complete with slip printing. I thought it would take 5 minutes at the most. But I'm so out of tune, that the slip had to be removed and re applied about 5 times! So frustrating. It's like anything else in life. Use it or lose it. But luckily another truism also applies - just like riding a bicycle, work out the kinks, and sooner or later you'll be rolling right along.


I still have more writing to do today, but tomorrow Holly will be joining me here for a long distance play date (also on Skype) and I'm hoping that I'll be able to get right back on that horse and gallop my way back to creativity.

Friday, September 28, 2012

Weekend Eye Candy - Granulation Edition


1. granulation globe1, 2. Pin #1: Stamen Series, 2005, 3. Granulation Cuff, 4. RAW52 #10, 5. Untitled Pendant, 6. Trouble With Lichen 12, 7. Gold "Old Work" Earrings, 8. Chameleon brooch for Andy Cooperman, 9. recycled copper boiler with silver granulation

I can't believe it's been two months since I last posted a Weekend Eye Candy. I've had things on my mind and too many balls to juggle. It's nice to see you again. I promise not to stay away so long again.

I love granulation. The ancient Etruscans made the technique famous, but it's enjoying a return to popularity thanks to modern jewelry makers. Traditionally the tiny balls are made by either clipping uniform pieces of wire or making a series of jump rings in a consistent size and then melting them. When metal (and glass) is melted to the flow point, it naturally draws up into a ball.

I developed my own way of making tiny balls out of metal clay. Roll the clay to the thickness of your choice, I roll two cards thick. Then use a cocktail straw to cut a number of disks. Find a place in your palm where the life lines intersect and roll one of the disks into a sphere. Roll hard at first to form the ball with no lines or lumps, then ease the pressure to make a perfect sphere. Be sure to cover the remaining disks with a damp paper towel as you work so they don't dry out.

Can you think of a way that granulation would add a decorative element to your designs?

Wednesday, September 26, 2012

It's All About Physics


Posted by Lora Hart
Artistic Advisor

On August 1st I started a grand, new adventure. I left my hometown of Los Angeles, California to move to Richmond, Virginia. The thought of moving had been kicking around in my thoughts since the turn of the millennium. It had become more concrete in the past couple of years as I talked it over with my East-coast cousins. My Father was born and raised in Richmond, so re-locating there made sense.


The move was two years in the planning. At first it was just the fantasizing part, then I flew out this past February to teach a weekend class and look at apartments and actually found a beautiful space that would be available in August. I filled out an application, sent in my deposit, and it was a fait acompli.

I stopped teaching at the end of June. Started packing at the beginning of July. Movers came, car transport took away my Matrix, and I got on a plane with the angel known as Donna Penoyer on July 31. Donna was kind (or crazy) enough to help with the final packing details in LA and took custody of one of my two cats so they could travel as carry on luggage in the body of the plane. Only one pet to a passenger. Then she stayed in Richmond for another week to help me settle in.

After Donna left and the movers made their cross country trek, Cindy Silas drove down from the DC area to help with the unpacking. Then Vickie Hallmark flew in from Austin to oversee the decorating and bookshelf building.

All in all, there was non-stop excitement and company for about two months. I'm so lucky to have had them. I'm pretty sure I couldn't have made the move without Donna, and the touchdown in Richmond would have been much more difficult without Cindy and Vickie. Thanks Ladies. I'm so grateful for your help and friendship. But I have to admit, I was kinda relieved when y'all left. For about four days. Then the ennui set in. There had been so much planning and moving and nesting and activity for so long, that when it settled down - I lost all energy. And once I started to rest and relax, it was hard to get motivated to start back in my regular routine.

There's a saying in physics, actually it's Newton's first law of inertia. "An object at rest will stay at rest, forever, as long as nothing pushes or pulls on it. I think there's actually a TV commercial running right now that references this phenomenon.

So, there I was, stuck on the couch. While I had set up the apartment so well that it was looking pretty good, the studio boxes were unpacked but still unorganized, and I had no interest in putting the table together that would allow me to actually work. Until I had a conversation with Holly Gage, who suggested that we have  Skype-y play date! That was just the push/pull I needed. Now the table has been put together, drawers have been built, tools and supplies organized, and my hometown public radio station's app downloaded to my iPad (I've been missing KPPC terribly and the studio seems a perfect place to listen). Yesterday I actually woke up wanting to go to the studio.

We all need a little help from our friends from time to time. But there are also those occasions when we have to figure out our own motivating force. Sometimes it can be as simple as sitting in the chair and handling tools. Or making little components like bails and earwires to have on hand. Sometimes we might benefit from a trip to the museum or a walk in the rain. Other times the force might be more quiet, necessitating a cease of all technological distractions. And sometimes the action needed to jump-start our momentum is more massive. Sometimes we may need to implement another advertiser's catch phrase - 'Just Do It'.

There are novelists who keep regular hours. They sit down at their typewriter at 8:00 am and don't leave until 5:00 pm. Even if all they're typing is "the quick brown fox jumped over the lazy dog" 400 times. They're practicing the 'Just Do It' method of creative physics. Once an artist picks up a tool to do something, anything, the muse will spark, one thought will lead to another, and the missing motivation will return. Eventually. We just have to be patient and proactive.

Friday, July 27, 2012

Weekend Eye Candy - Beach Edition

This is very probably the last Weekend Eye Candy that will be curated from my tiny studiolo in Venice, California. All of the images were found through a search for "beach". Notice the Venice boardwalk in the last row.

I'm almost finished packing up and saying goodbye, and taking a last look around this wonderful city.

I was born in Hollywood, and lived in the San Fernando Valley for the first 30 some-odd years of my life. The last 26 have been spent in Venice. It's a strange feeling to be getting ready to abandon the land of my birth, but the butterflies are beginning to stir at the promise of a new adventure.

Thursday, June 14, 2012

Weekend Eye Candy - Art of Containment Edition

The very last PMC Guild sponsored conference is about to take place next week. To honor the occasion, here's a taste of some very sweet containers from some very creative metal clay artistes.

Saturday, May 26, 2012

Weekend Eye Candy - Memory Edition

It's Memorial Day weekend in the United States, and all of these images were found through a search for the word 'memory'.

Jewelry can be a talisman, a private token that holds a moment in time, a tangible manifestation of an entire relationship, or a collection of facsimiles that tell the story of a life.

The memories associated with a special piece of jewelry can be a powerful force. As I begin to pack and purge for the big move, I'm finding things tucked into corners that I'd long forgotten about. And know, that even though they haven't seen the light of day in many years, I'm still not ready to consign them to the thrift store. The stories they continue to tell are too powerful to silence.

I have a whole collection of my Mother's belongings that will travel with me to Virginia. The gloves, handkerchiefs, and 60's costume jewelry still whisper their fairy tales. And I still listen and long to believe.

Tuesday, May 22, 2012

And life goes on...

I've been busy getting ready for my big move to the east side of the continent. I've been working furiously on my seminar for the last ever PMC Guild sponsored metal clay conference. I've been overwhelmed and stuck at times too, just sitting stagnant at my desk. But I've also been thinking, planning, re-imagining, and  looking forward to creating a whole new time in my life. And I wanted to share some of that mind mapping with you.

I'm revamping my fabulous Mentorial service.  I have lots of ideas, lots of notes jotted on various pieces of paper, lots of value added pluses to help you wonderful artists be the best you can be! I also still have lots of purging, packing, shipping, and cat carrying to do - so there will be a launch party for the new and improved Mentorials in September!


You may have noticed that the past few Weekend Eye Candy posts are more closely related to the Candy's specific content. I'll be continuing in that vein until my move is complete, but then look for a weekly article that will focus on craft business, making, or other aspects of our chosen addiction.

I've designed a new Intro class for the metal clay enthusiasts of Richmond, Virginia which I'm proud to say will be held at the beautiful Visual Arts Center. I'm also going to be opening a studio to teach more advanced classes as well as offer regular Sunday Sessions so we can all get together for Play Dates, to work on specific projects, and talk shop.


If you'd like to be included in my new and improved mailing list too, send me your email addy to get updates on the planning progress.

Thanks for reading, for sticking with me through the thinner posting periods, and for all your support.

Friday, April 27, 2012

Weekend Eye Candy - Planning and Preparation Edition

Jewelry making should be more than just tearing into expensive materials and starting a new project. The more time you take planning the design in advance, the more likely you are to have what you consider a successful outcome.

If there's an unusual object that you'd like to set, place it on a piece of paper and draw a few different possible examples of the metal backing around it. Wanting to try a new chain design? Make a maquette out of paper first. Trying to figure out how to put together a complicated construction? Use polymer or paper clay to work out each step in the process before you get out the silver.

One of my favorite tricks is to draw a design I have in mind, then repeat the process altering a few details. Repeat the whole thing 5 times, using each previous drawing as a jumping off point for the next iteration. By the time you have 6 drawings of the same theme, you'll have worked out the design in your mind and can choose the best version to get started on your piece.

Friday, April 20, 2012

Weekend Eye Candy - Steel Edition

This week I'm in Richmond, Virginia to teach a class and start the search for a new home. Yesterday I also took the time to stop by one of the best galleries on the eastern seaboard - Quirk. I love visiting Quirk because they showcase many of the jewelry artists that I stalk online. This time I was able to fondle the work of Catie Sellars, Amy Tavern, Jillian Moore, and Megan Auman. (to name but a few).

I'd seen everyone's work before in other galleries, but never Megan's. She works almost exclusively in steel wire and I had always assumed it was a medium gauge binding wire of the sort one might find at the hardware store. What a wrong impression one can develop when viewing images online! Megan's pieces were thick and sturdy, but also very lightweight, and I was sorely tempted to add to my earring collection.

There's nothing like being able to see a thing in person. Whether it's a painting, piece of jewelry, or other work of art. Why don't you take a trip to one of your favorite galleries this weekend and share your discoveries in the comments section here on Monday?

Wednesday, April 11, 2012

Dealing with Overwhelm

I wouldn't wish my current predicament on anyone. I feel like I should belong to a 12 step group. Step one. Admit you have a problem.

Hello. My name is Lora and I'm a procrastinator.

Source

I've been meaning to write reviews on both Gordon's and Patrik's wonderful new books. And I will, I will! I meant to get started long ago on the PowerPoint of my seminar for the upcoming PMC Guild Conference. I knew I should start purging at the beginning of the year in preparation for my move later this summer. I have invoices to send. And submissions to mail. And emails to respond to. And class samples to make. And art to conceive and bring to life. But I haven't. And now I'm feeling overwhelmed. So overwhelmed that I've done pretty much nothing for the past week. I'm stuck in the mass of "shoulds" that are clogging  my brain.

I really DO have to start purging and packing. And I really DO have to get started (and finished) with my seminar presentation. And I DO have to mail and respond and post and clean and... and... Sigh. What I DON'T have to do is spend time on Pinterest, or FB, or surfing through Zappos, or downloading apps onto my new iPad. I need to TCB as Elvis used to say. Take Care of Business. Pare down the time wasters and rev up the task accomplishing.

In the past I've used a few different methods to keep track of and get started on my to-do's.  But the best method of all (for me) is pencil and paper list making. Usually I just write a big long list and do whatever I want first, second, third, and so on. What ever is left over goes on tomorrow's list. I love the crossing out portion of a paper list. That little slash of the hand makes the accomplishment feel so much more concrete. I just don't feel the same rush when I use a check mark or line through feature in a computer word program.

This morning I read a post with a new twist on the ever popular paper to-do list. It featured a way to prioritize the tasks! Imagine. Prioritizing. What will they think of next? You divide the list into four columns or quadrants. Important/urgent, important/not urgent, not important/urgent (how does that work exactly?), not important/not urgent.

This morning I decided that writing a blog post was both important and urgent. I keep putting it off in favor of other tasks, but it's part of my business plan to keep a blog. Besides, I like blogging to all of you folk who are so faithful to my infrequent writing, and I feel terrible that I've been ignoring you.

I've heard about another great way to get things accomplished. Say it outloud. To real people. People who will hold you accountable. Will you all be my accountability partners? This is my list for the rest of the day (it's 9:11 am at the time of this writing).

1. Blog post
2. Gather everything that must be mailed and do whatever is necessary to put it in the envelope (label the CD, write the check, etc.).  11:09 am
3. Take the mail to the post office. 1:08 pm
4. Purge everything under the kitchen and bathroom sinks in preparation of the move (I'm going to do at least one thing a day until it's time to get the boxes out). Kitchen Done - 3:54 pm
5. Make a list of things to bring to Richmond for next weekend's class and gather them after class tonight. List made 5:31 pm

That's enough. I have a lunch date and am teaching tonight. I know what to do and what order to do it in. Thanks for listening. I feel better already.

Thursday, April 5, 2012

Weekend Eye Candy - Shooting Multiples Edition

Placing more than one piece of jewelry in the frame when taking a submission or beauty photograph is not as easy as it may seem. How you position the pieces creates an added layer of interest or can lead to a very dull and uninteresting shot.

Do you line things up in a row, hang them in a way to show a vanishing point of view, angle them in a diagonal line, lay them out flat... The possibilities are endless.

Arguably the best thing a maker can do to boost their career, sales, or marketing, is to learn to photograph their work so well that even a static image is a show stopper. Or else hire a professional to do it.

Not all pro photogs are prohibitively expensive, and it's not really that difficult to learn how to take the very best pictures you can with the camera set up you currently own. Unless you're 'shooting' with your copier. Then I'm not sure what to tell you.

College students have to learn somewhere. Why not contact a local JC to see if you can interview someone who is interested in working on their portfolio? The type of photographer you're looking for is someone who specializes in 'tabletop'.

Another idea would be to look at the work of other makers and note their photographers. Look them up online and see if they list their pricing structure. It might not be as high as you imagine. My fabulous images are taken by a woman who has a day job (in tv) and is working towards building her post retirement career. She only charges $30.00 per shot!

There are many, many helpful tutorials online that show self taught artists how to successfully photograph their own work with little financial layout. You can use sunlight, a transparent trash can for a light box and a flashlight or craft light (Ott) as a 'pin' or highlight.

If you only do one thing to elevate your business this year, making sure you have great images of your work should be #1 on the list.

Friday, March 30, 2012

Weekend Eye Candy - Stress Edition

As I get closer to moving from the city I grew up in (Los Angeles) to a new town that I'm admittedly not very familiar with (Richmond, Virginia), I'm feeling the stress a little more each day. Where will I live? How will I adapt to new temperatures and landscapes? What am I thinking???

The reasons why I decided to move at the age of 55 are all still valid. I want a larger living space/studio and real estate prices in Los Angeles are prohibitive, I've been craving a change of scene since the turn of the millenium, and a I have a burning desire to shake up my complacency to see where it leads.

But those reasons don't make the reality of my move and all that it will entail any easier to deal with. Cousins. Cousins will make the move easier. And I'll see them in April when I go out for a test run of the Visual Arts Center where I hope to start teaching full time next fall. But for now, I'm feeling a little flummoxed with all the terrors of moving myself, my car, my belongs, and mostly the kitties. I'm overwhelmed at the thought of leaving the wonderful metal clay community and teaching venues that I built from scratch over the past ten years. But at the same time, I'm looking forward to all the wonderful opportunities that I'm about to encounter. Just waiting for the anticipation to blossom into reality.

Friday, March 16, 2012

Weekend Eye Candy - March FAM Edition

Weekend Eye Candy - March FAM Edition by lorahart
1. to the point, 2. FAM Feb, 3. FAM 3/2012, 4. A whole lot of Gemmy Goodness :), 5. FAM/Jan/4of4, 6. FAM - Février, 7. Bracelets, 8. FAM, Month #1, Exploring Spirals

The Four a Month challenge is inspiring such wonderful work! I'm proud of every one of these makers. Have you joined in? It's not to late to ramp up your creative spark!

Monday, March 12, 2012

Today's the Day!

My CraftCast class is going live at 5pm Pacific time, 8pm Eastern time. I'm really excited about this new experience and I hope you'll join me to learn how to make Slip Prints with metal clay. I'll show you how to make stencils and templates, how to use commercially made stencils in a way that will make the design unique to you, how to make a fire-in-place movable bail, I'll demonstrate 2 different precision rolling techniques, and more. And if you attend the live class (as opposed to buying it as a download) you'll be able to ask questions about anything on earth. Not that I'll have the answer for the meaning of life, but I'll do my best to help out on almost any metal clay topic.

I had a run through with our Mistress of Ceremonies, Alison Lee, last Friday and I think it's gonna be a pretty darn good show! Will I see you there?

Friday, March 9, 2012

Weekend Eye Candy - Slip Print Edition

Weekend Eye Candy - Slip Print Edition by lorahart
Slip Print examples. I'll be demoing the one in the middle of the first row.
I've been crazy busy preparing for my first online CraftCast class this upcoming Monday evening (after a little break in Texas with my artsy gal pals).

I know the pdf is going to be fabulous. I've been writing handout sheets and step by step articles for years and years. I think I've got that down! But taking video is a whole new adventure.

My very professional video set-up.The camera is clamped to a gadget
that is clamped to one leg of my soldering tripod, which is weighted 
down with my bench block. An Ott-Lite provides white light illumination.

 One needs to figure out a way to suspend the camera, keep one's hands in the middle of the lens (amazing how often they'd stray out of bounds), make sure the image is well lit and in focus, make sure you're telling the story you want to communicate... Sheesh! I have a whole new respect for those of you who regularly do 'how-to' videos.

Now I can get ready for my first teaching engagement in my soon-to-be new hometown of Richmond Virginia. I'm offering "The Art of the Bead" at the fabulous Visual Arts Center, and I think there are still about 4 seats if any of you on the east coast would like to meet up.

After that - I'll be swamped again with plans for my seminar at the last ever PMC Guild sponsored conference in June. Topic? Teaching 101. I think I know a bit about that too.

Then packing, moving, feeling guilty about trapping the cats for the 5 hour plane ride, unpacking, feeling guilty about freaking out the cats in a new space... sigh. It's a busy year! And I'm so grateful for all the wonderful new experiences that have come along with it.

Friday, March 2, 2012

Weekend Eye Candy - Play Date Edition

FAM February. Enamel trials by lorahart
FAM February. Enamel trials, a photo by lorahart on Flickr.
Last week I went to Texas to for a long distance play date with Vickie Hallmark, Lorena Angulo and Laura Wood. It was one of the best vacations I've had in a long time. A practice I highly recommend to anyone in need of an inspiration boost.

These enamel on copper samples were made under the expert guidance of Miss Vickie on Saturday. We used a 'crow' pen (similar to a traditional quill) to draw black outlines on prefired white enamel. Then we went back with a paintbrush and watercolor enamel to add color and fire a third time. This was all done using a Little Torch.


I've enameled before, but never with a torch, never with a pen, never with a paintbrush, never with this kind of imagery, never with such a detachment to the outcome, never with such delight in the results.

These little disks are destined to become some sort of brooch and each will be gifted to the other ladies of the play date as a reminder of our time together.

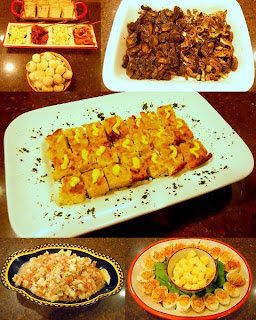
Just a small sample of the fabulous food made byLorena's husband Jorge. Between his feasts and
the ones prepared by Vicky, my Texas experience was a gourmand's delight!

We might even make this a yearly thing. Next year in Richmond, after I move. Although the food won't be nearly as yummy with me presenting it. You notice I didn't say cooking...

Thursday, February 23, 2012

Weekend Eye Candy - Texas Tarts Edition

I'm packing up for a little jaunt to Texas to see my dear friends, Lorena Angulo and Vickie Hallmark for a prolonged weekend play date!

I'm so excited to be able to see these girls in person again. I last spent time with Vickie last year at Idyllwild's metals week, but I haven't seen Lore since the 2010 conference. Woo hoo!

While I'm there I'm also thrilled to be able to meet a jewelry artist that I've been stalking in cyberland. I think I first became aware of Laura Wood's gorgeous work at an exhibition at Arrowmont and later on CraftHaus. She's a wonderful fabricator who uses handmade paper and sterling silver in her work.

I'll see you all on Wednesday with a full report. In the meantime, Have a creative weekend.

Monday, February 20, 2012

First Four a Month - Check!

I've taken lots of classes. Most of the time I never actually complete the proposed project, but I absorb skills and techniques from each teacher I meet. I also 'take classes' during my day to day activities by practicing what I call 'Mindful Observation'. While looking through books, surfing the web, and handling work in galleries, I look at construction details and try to see if I could recreate a setting, clasp, or other working element. I don't think that appropriating the mechanics of a design is the same as copying or usurping another artist's voice.

Joanna Gollberg, 'Reds to Yellow' Brooch.
I recently made four brooches for an online personal challenge by adapting a prong design that I first admired in Joanna Gollberg's work. I tried to replicate her technique in a ring I made last year for Ring A Day. But it felt too similar to what she is known for, so I decided not to make it again. I've since seen other artist's use the same design - there's nothing new in the world - but I'm still not comfortable using it in exactly the same way that Joanna does.

My attempt at Joanna's setting technique
This year I decided to adapt the design to marry a metal clay element to a hand made porcelain shard for my first entry to the Four-a-Month challenge. To make each setting, I first bent 20 gauge wire into a loop that would support the porcelain shard. Then I soldered prongs to capture and hold the shard in place - some horizontally, and some upright. I was able to solder them together using a butane torch, but I have to say - as simple as it looked to me at first, completing so many joins at once is not an easy task. I'd get three finished and move the flame to the fourth - only to have the first lose the connection! These settings were a study in patience for sure. But I really liked doing them and was much better by the fourth brooch. I'll definitely use this technique again.

Brooch skeletons
After I made the backings I soldered a metal clay piece to each setting, a 'scatter' pin to two, a fine silver tube to the others, patinated them, and set the porcelain bits. Then I inserted steel wire into the two tube sections to make double pin stems. I'm really thrilled with this design and can't wait to expand on it. I'd love to make a multi piece neck collar, earrings and perhaps even a bracelet to fill out the series.


I'm really excited to be teaching the texturing technique I used on the metal clay elements for Craftcast on March 12! Hope to see some of you online in 'Learn to Stencil Using Metal Clay'.