
I've taken lots of classes. Most of the time I never actually complete the proposed project, but I absorb skills and techniques from each teacher I meet. I also 'take classes' during my day to day activities by practicing what I call 'Mindful Observation'. While looking through books, surfing the web, and handling work in galleries, I look at construction details and try to see if I could recreate a setting, clasp, or other working element. I don't think that appropriating the mechanics of a design is the same as copying or usurping another artist's voice.
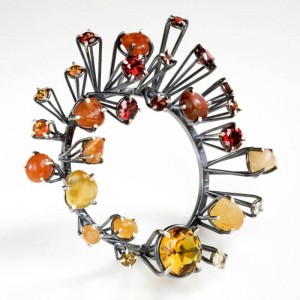 |
Joanna Gollberg, 'Reds to Yellow' Brooch. |
I recently made four brooches for an online personal challenge by adapting a prong design that I first admired in Joanna Gollberg's work. I tried to replicate her technique in a ring I made last year for Ring A Day. But it felt too similar to what she is known for, so I decided not to make it again. I've since seen other artist's use the same design - there's nothing new in the world - but I'm still not comfortable using it in exactly the same way that Joanna does.
 |
My attempt at Joanna's setting technique |
This year I decided to adapt the design to marry a metal clay element to a hand made porcelain shard for my first entry to the Four-a-Month challenge. To make each setting, I first bent 20 gauge wire into a loop that would support the porcelain shard. Then I soldered prongs to capture and hold the shard in place - some horizontally, and some upright. I was able to solder them together using a butane torch, but I have to say - as simple as it looked to me at first, completing so many joins at once is not an easy task. I'd get three finished and move the flame to the fourth - only to have the first lose the connection! These settings were a study in patience for sure. But I really liked doing them and was much better by the fourth brooch. I'll definitely use this technique again.
 |
Brooch skeletons |
After I made the backings I soldered a metal clay piece to each setting, a 'scatter' pin to two, a fine silver tube to the others, patinated them, and set the porcelain bits. Then I inserted steel wire into the two tube sections to make double pin stems. I'm really thrilled with this design and can't wait to expand on it. I'd love to make a multi piece neck collar, earrings and perhaps even a bracelet to fill out the series.

I'm really excited to be teaching the texturing technique I used on the metal clay elements for Craftcast on March 12! Hope to see some of you online in 'Learn to Stencil Using Metal Clay'.
No comments:
Post a Comment