Tuesday, November 30, 2010

Being PRO Active!

I'm so very pleased with my very first PMC PRO outcome. Hallelujah!

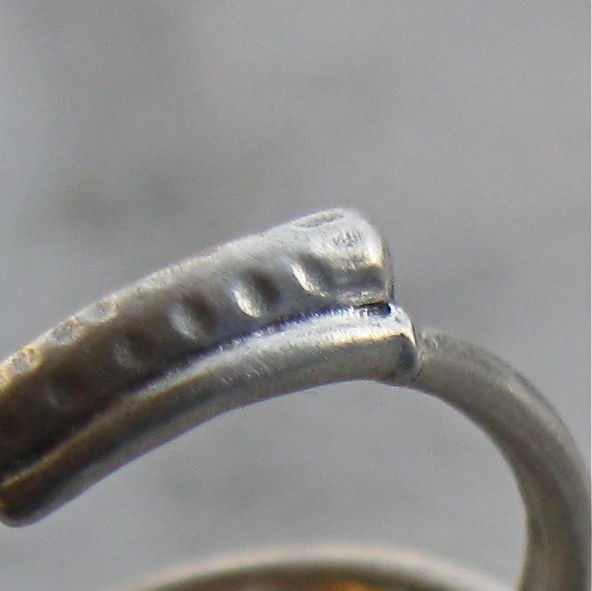
One of the rings broke in the greenware state and I fixed it by gently spreading the break open and applying some very thick home made slip into the crevice. I pressed the two sides back together and left the excess in place. Didn't smooth after it was dry, didn't sand it away, didn't do any more reinforcement. I wanted to see if such a quick repair would hold. Then before firing I quickly sanded all rings with green; 400 grit; 3M polishing paper, poured 1/2 inch of mystery carbon into my Hadar Jacobson home made fiber blanket box, set the rings in lightly,  put another 1/2 inch of carbon topped with another piece of fiber blanket (to act as a lid), set the kiln to a fast ramp to 1420 for 1 hour and went to watch reruns of Miami Ink. When the buzzer went off that indicated the firing was done - I picked up a kitty or three and snuggled until I went to bed. Taking PRO out of the kiln while still hot would create oxidation and I wanted to avoid that.

Got up this morning all excited and everything, went to the kiln and pulled my hand back in surprise. Still Hot!! Who'd a thunk? Well - I just couldn't stand to be patient one minute longer and used a tweezers to pluck the hot rings out of the carbon. While rooting around I realized that the carbon had totally burned to ash. Was it because I added a piece of fiber blanket on top? Fiber blanket is so heat retaining (which is what it's designed for) that the extra piece on top was overkill? Food for thought and more experimentation.


The oxidation was very easily removed with red 3M Radial Disks and I was glad to see that the color of PRO is lovely. I actually like it better than fine silver PMC. There were some surface sanding and maker's marks (fingernails must be trimmed on a regular basis) that I removed with a piece of the same green, 3M polishing paper loaded into a split mandrel/flex shaft. One of the rings did get flung across the room and has not come to light - but when the studio gremlins are done admiring it, I'm sure it will be returned.

When I re measured the ring sizes I came up with a size 4, 5.25, 6, 6.5 and 8. A pretty all around shrinkage of 4 sizes. The thinest area of the coil shrunk from 1.56 mm to .72 mm. And it's incredibly strong! Even my quick and dirty repair is as strong as Popeye.

My next experiment will be to make identical rings from PRO and PMC3. I've heard lots of complaints about the added expense of PRO, but I think that since it is stronger and you can make items thinner than we're used to - the cost per piece will be very comparable in the end. A ring made of PMC3 must be 5 cards or thicker to be strong and durable. A ring made of PRO seems to do just fine when only 3 cards thick. I may even try two cards just to see what happens.

Monday, November 29, 2010

Becoming a Pro with PRO?

Well, I hardly think that my tiny experiment this morning will qualify me as any kind of an expert. Far from it. But I had a fun play with my 15 g pack of PRO clay courtesy of PMC Connection.


I have a show coming up next weekend so I decided to make some little rolled rings. I divided the pack into 10 slices and began to roll each slice into a snake, which I then wrapped around my Multi Mandrels. Needless to say I realized by the second one that 10 equal slices will not make 10 equal rings on 5 different sized forms. DOH!


After stealing a bit of clay from one of the slices I finally made 5 rings in sizes 6, 7, 8, 9 and 10. And since I wrapped a strip of teflex around each form first - they're really 6.5, 7.5, 8.5 and so on. I also set a 1.5 mm white sapphire in the end of each snake. When they're dry I'm going to do a bit of carving and then pop them in the kiln. I'll be interested to find out what size the rings shrink down to. More pictures as they develop.


As advertised, the clay is yummy right out of the pack. The first thing that I noticed is that it is a much darker grey than PMC + or 3. No problem identifying an escapee from the labeled package. Making a bit of home made slip was a breeze. I did take a long time to roll the first coil to length, try it for size, roll it longer, try it again etc - so it did dry a bit and crack as I wrapped it around the mandrel and I had to smush and re roll. But only used a bit of water and didn't "let it rest" as I would have for the other formulas of silver clay. Can't wait to order a regular size package of PRO and make some pierced brooches. I think this clay will be a lot of fun to use.

Friday, November 26, 2010

Weekend Eye Candy - Thanksgiving 2010 Edition

The best prayer you can ever say - Thank You!

I'm grateful for friends near and far; bright sunshiny days; warm beds and a cool head; family - both with & without fur and laughter in the rain.

Happy Thanksgiving!

Friday, November 19, 2010

Weekend Eye Candy - Birthday Edition


It's my Birthday! So I thought I'd throw a party with some of my favorites. ;D

Wednesday, November 3, 2010

Pro or Con?

Last night there was an incredibly informative class/discussion about a new metal clay product put out by Mitsubishi Materials called PMC Pro. It's an alloy of fine silver and copper. 90% silver, 10% copper. Those are the same proportions used in Coin Silver.

Wikipedia has a really informative entry on the variety of silver standards that are used around the world. The 92.5 that we're used to calling Sterling and that we feel comfortable using as the "go to" white metal is just one alloy that is available to jewelry makers. There's been a real resurgence of interest in Shibuichi - 95% copper and 5% silver (although I know that isn't considered "white" by any stretch of the imagination). Reticulation silver is (generally) 82% silver and 18% copper. Mexican silver is 95% silver and 5% copper. There are all kinds of wonderful metals available to make beautiful jewelry with.

So why has there been such a hubbub online in the past few days about this new offering from Mitsubishi? It's an unknown? People don't like change? It's an election week and distrust in in the air? I don't know, but what I do know is that last night's class was a wonderful introduction to a new material presided over by one of the most respected people in the metals world (clay or milled) and "assisted" by three other incredibly talented and knowledgeable artists. None of whom are on the payroll of said manufacturing company by the way.

Rings by Celie Fago. See how narrow the shank is on the signet ring? And the laced ring is only 3 cards thick!

Tim McCreight, Jeanette Landenwitch, Barbara Becker Simon and Celie Fago generously shared all they've learned in their explorations with this new material. Making the learning curve shorter for the rest of us.

From Tim we learned that this new alloy was developed, as is, because Mitsubishi wanted to meet a number of standards that they felt would make Pro an attractive product. They were looking for tensile strength, stretchability, bending strength, surface hardness (resistance to dings and dents) reasonable firing schedules and methods, and beauty of color. They tried all sorts of alloys, including sterling, and this is the one that met the majority of their pre requisites.

Rings by Patrik Kusek

From Jeanette we learned that enameling is possible with this new alloy with the added bonus that you don't have to depletion gild it! From Barbara we heard that she has not quite figured out how to judge the shrinkage when making her gorgeous bangles. One came out too small (bonus for her daughter) and one came out too big. Which was actually a blessing, because in trying to fix it she learned that it is oh so easy to attach fresh Pro to fired Pro with some homemade slip. Good to know! Celie will be making all her hinges and catches with Pro from now on. It's so hard and strong that her beautiful curly box catch doesn't flex at all when snapping shut. Although the one previously made with PMC3 - does.

This one was made with PMC3, but I couldn't find the image of the new one online.

There was so much more. The information flowed for an hour and a half. And if I had any kind of a good memory, I'd most likely be sharing more of what I heard. But taking a class is so much better than waiting for information to trickle through the cyber pipelines, isn't it? That's why I paid my money the first day the class was announced. The class was sponsored by Rio Grande and PMC Connection (the only two importers of PMC) and since I'm a senior instructor my money was refunded and I got to listen in for free, but I would have been happy to pay for the wisdom.

I'll leave you with some of the bullet points about PMC Pro and hope you'll give it a chance. It's not for everyone. It's much better for some techniques and perhaps overkill for others. It's more expensive due to the manufacturing process, but so are ready made sterling tube, bezel wire, sheet, earring wires - etc. It's a really interesting addition to the alchemy that is metal clay and I can't wait to try it!

  • Fire to 1400ºF in carbon for one hour. Fast ramp. No nonsense.
  • 1/2" spacing between pieces and the bottom or top of the carbon layer. A US nickel is about an inch, so half of Jefferson's face should be buried.
  • PMC Pro can be used along side PMC3 but the two should NOT be blended to make a different alloy. Fire for 30 minutes in an open firing to burn off the binders in the PMC3 and then for another 30 minutes in carbon.
  • Use only easy or medium solder on finished pieces. The melting points of hard solder and PMC Pro are too close for comfort.
  • Make your own slip by adding water to the Pro clay just as you always do with the other formulations. Tim added some lavender oil to make it nice and creamy.
  • If you let the fired pieces cool in the carbon/container they won't oxidize.
  • You can use the same tools you always use, but not the same sanding supplies.
  • Shrinkage is between 15% and 20%.
The PDF notes that were e-mailed to attendees of last night's class have also been uploaded to the PMC Guild website. Look for a great way to make your own firing container. Happy learning!