I did get all the earrings done yesterday! Hurray! And I learned exactly why people make sketches, create production lines and basically think first.

Anyone else see Daisy Duck's feet in these earrings?
I had all the components and a vague idea of what to do with them. But reality is so different. One element that I was sure would be fabulous - wasn't. But another I hadn't even though of was! I made an earring wire design that I'd never done before and ruined some sterling wire trying to get it right. Then I got the bright idea to experiment with copper wire first. Duh.

I'm happy with these and might actually make more, now that I know how they'll turn out. But I also think I'm going to do some drawing this afternoon.

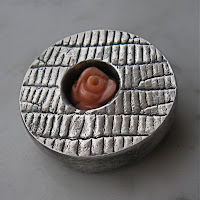
This morning I wanted to get the ring done so I can have it photographed for the Annual. One would think it would be easy. I've made a million of 'em. Okay. Slight exaggeration, but you get my drift. The hole in the coral flower was larger than 20g though, so I wasn't able to fall back on my old trick of using earring posts for the wire. This was my first time just using a simple butt end cut wire. And it was much easier than I thought. What was I afraid of before???

The only real tricky part was figuring out how to set it up. I ended up using Chris' Soldering Tool to hold the ring in place (assisted by a groove dug into my board) and a third hand to hold the wire onto the ring, which I always do with the earring post. Worked perfectly.

Later I remembered that I could have drilled a little hole in the top of the ring to fit the wire into. That might have made a better solder join. But I think this one will be fine. I set the flower onto the post with resin. I usually use 2 part epoxy, but the resin was out and I thought I'd try it. Anyone know a reason for me to take it off and set it with the epoxy instead? (edit) Well, the resin didn't cure of course. How did I think the light would get up into the hole? I re set it with 2 part, 5 minute epoxy and it's great.

Trying to solder a post into the cavity did not work! At least with this set up. I think it might have worked had I placed the piece on a trivet and torched from underneath. As it is I ended up drawing a ball on the end of the wire and the solder refused to flow.
I had the resin out to set another flower into the cavity of a bead I made as a class sample. I turned it into a brooch by soldering a wire catch and a fine silver tube to hold the pin stem. It was all going so well until after I cured the flower/uv resin I was using. I put the steel wire into the tube and tried to bend it when suddenly the tube broke in half! I think it was too short and wouldn't take the torque from the bending (steel wire is realllly hard to bend). I had also scratched the tube somehow and had polished the scratch out. Maybe I took away too much material.

Now I have to get out the Attack, remove the resin and flower, torch off the patina and re solder another tube. Ah well. Such is the life of a jewelry maker. Nothing is easy.

4 comments:
Love, love, love those earrings! Play with those ideas more now that the details are worked out. :)
These are all great! I especially like the duck feet because I love the texture, like old wallpaper and the very large amount of space that has black patina. The reverse of what I seem always to do. I have made some box beads with a pearl inset in them, I put the peg in the wet clay and reinforced the slight bulge in the back of the piece with a signature disk. Resin is a creative solution. Many ways to get the job done.
Joan Furilla
http://jfurilla.wordpress.com/
Just keep going! The first round of things is always hardest, when you're asking all those "will this work?" questions. Now that you have everything worked out, just make variations on all the good stuff.
The ring is perfect for the annual.
um....i always thought 2 part epoxy WAS resin ...
gorgeous, gorgeous work!
Post a Comment