Friday, June 25, 2010

Jury's In - Again.

How could I have forgotten possibly the most important point!

14. DON'T COPY! If you've taken a class with a well known teacher and have used the class project exactly as demo'd to learn the steps, do not, under any circumstances submit the results from that learning experience to any publication. You did not design the item, you did not formulate any of the steps that went into the construction and you do not have the creators permission to claim that assemblage of techniques as your own. There were a couple of images of pieces whose originator I could immediately name. No matter how good the photograph or how well the piece was executed, it had no chance of inclusion.

Copying is not flattering. Co opting another's style because you so admire their aesthetic is not "a piece inspired by..." It's theft. Perhaps not a legal theft. But an invasion none the less.

Using someone's style or construction techniques as a jumping off point is absolutely allowable and even a traditional way of learning. Examine the way Leonardo used paint and the direction of his brush stokes. Admire the hazy backgrounds. Even become obsessed with amusing grins - but do not sit in the Louvre and make an exact copy of the Mona Lisa and then try to submit it to Smithsonian magazine.

Use your own imagination, break out of your self imposed constraints, challenge your own processes. That is what makes a good artist. Take that damn lentil bead and do something with it that has never been done before. Use that well known teacher's teachings to take yourself to another level of creation. One of your own imaginings.

The Jury's In!

I wanted to take the time to congratulate each and every artist who sent in submissions to the PMC Guild Annual! I honor everyone who puts their work and their egos on the line by submitting photographs anywhere. It's not as easy as it may seem. Inviting a group of strangers to judge you and your creativity is an anxiety producing exercise. Seasoned artists and those just taking their first nervous steps are equally stressed by the entire process.

I was so honored to be on the Jury this year and took my responsibilities very seriously, as I know all the other jurors did. To be in company with Barbara Becker Simon, Lisa Cain and Bruce Baker was an experience I won't soon forget.

Last year 114 beautiful works of art were published in the 3rd volume. This year 456 images were submitted by over 120 artists. The work of 62 finalists consists of 120 pages displaying 130 photographs - some with multiple views. It was a daunting task to review each and every entry. I, for one, was looking for innovative design; excellent construction techniques and stellar photography. The jurors never met. Either in person or online. We never discussed our views. Only Jeanette Landenwich knows who liked which pieces. And our views didn't necessarily mesh. Scores were to be from 1 to 5 with 5 being highest. We only overlapped on about 6 5's and 3 4's. So you can see we were all looking at different criteria.

The chosen pieces are all wonderful and beautifully presented. I have to say that there were pieces left out that I just loved. And some included that were not to my taste. But that's the way a jury works. Multiple opinions with one final decision maker.

For those of you who have yet to stick your toe in the waters of publishing or those of you whose work may have been left on the cutting room floor, I thought I'd offer a little insight to what I noticed as I was reviewing all of the submissions. And keep in mind that photographing work for Etsy is different than for shows which is different for publication which is different for editorial which is different for advertising. So one photo will never please everyone who might view it.

1. I know you have heard this time and time again - but professional photographs are imperative. This doesn't necessarily mean you have to pay someone else to shoot your work, but it does mean that if you choose not to - you need to learn how to do it properly yourself. Many of the photos in this year's book were taken by the artist.
2. Do not submit scanned images. The way the light from the scanner hits the highly reflective surface of a silver item is less than flattering to say the least.
3. Do not use fabric as a background. No matter how "artistically" draped. The weave of fabric distracts from the jewelry's form and in some cases might steal the scene from the intended presentation.
4. Unless you really know what you're doing solid black and solid white are difficult backgrounds to use correctly. Black velvet and white paper show every dust particle, cat hair and other anomaly.
5. Never photograph work on a stand or neck form. Live models might be fine for some submissions, but even those are chancy.
6. Don't use decorative paper, stone or props. They're distracting and don't add anything to the image.
7. Remember your audience. In this instance we're talking about a metal clay publication. The metal clay is the star. Don't include commercial elements - chain or clasps. Don't include strung beads unless they realllly add to the focal element or include metal clay beads. Don't even include a metal clay clasp in the photo unless it is unusual.
8. Do remember that cropping is your friend. Even if you have a professionally taken image - you can re crop it to fit the submission. Something that Art Jewelry magazine might love to print, might include elements that the Annual isn't interested in showing.
9. Do use a gray scale background. You can buy them from specialty photo suppliers or make your own with a copier and Photoshop. Or buy one and then make lots of copies for future use (they scratch easily). Vickie Hallmark has a terrific blog entry sharing her tricks and tips for jewelry photography. There are 3 parts. you'll have to do a search to find the other two. Or perhaps I can convince Miss Vickie to put them in a side link on her blog.
10. Do experiment with a reflective surface. But make sure there are no reflections of the camera, your yellow shirt or the flash from the bulb.
11. Do try to find a professional photographer you can work with. Perhaps your local college has a photography department and you can ask an upperclassman to help you out. For a small fee of course. Look at the by-lines in the Annual and ask the artist for information on their photographer. Those who took their own might want to start a new sideline! Ask the "photo by artist" people if they'd consider taking piccies of your work.
12. Do make sure that everything is in crystal clear focus and sent in the highest/largest dpi format you can manage.
13. Do push your own limits of creativity to design new and exciting work! Metal clay has been around (in the U.S.) for 15 years now. We've seen all the lentil beads; flat, textured and cookie cuttered; simple work that we need to see. (my harsh opinion remember) Ask yourself "What If". What if you cut that thing with that shape, turned it upside down and painted it pink? What might you discover? What new techniques might you bring to the metal clay community? What new corners of your own mind might you discover?

When you get to see the fabulous 2010 PMC Guild Annual in October, you'll notice that there are a few entries that fly in the face of the suggestions I just finished making. These suggestions are MY opinion after all, and I am certainly not the end all and be all. But I know that there were people who submitted really interesting work with really um... less than excellent photographs.

You don't have to wait until next year to benefit from this post though. Holly Gage has just put out the word that she's looking for fabulous work for her 2011 calendar and you have loads of time to get up to speed! Well, a couple of months anyway. So try, try again. Or for the first time. You have nothing to lose.

And for those of you who don't make the cut, sometimes you just have to think of editors as casting agents and yourself as an actor. They just didn't want a brunette this time. This time they were intrigued by the red heads. But there are agents out there who love the brown haired girls. Some of them may have already cast you. And more will in the future. You just have to be in the right place at the right time with the right agent when you're auditioning for the right part. (Forgive the former make up artist in me for the analogy.)

Wednesday, June 9, 2010

Gettin' Ready!

Long time no see. I've been furiously trying to get ready for my three day show at the Contemporary Crafts Market in Santa Monica California. In you're in the neighborhood, be sure to download a free pass (and be sure to notice who's photo was used in the postcard on the far right). I'd love to see you.

I finally completed some more pendants for my Specimen Container series. Some of the containers I've had for a while - waiting for the perfect specimen, and some are newly made. I'm happy with how they turned out. Hope some of the visitors to the show think they're nice too!

So, the rest of the day will be dedicated to pricing and getting my booth supplies together. I'll set up sometime tomorrow so that I only have to finalize the actual jewelry displays on Friday morning.


I'd say I was looking forward to taking a big breath on Monday, but my 8 week class at Otis starts on Wednesday night and it's sold out! Fancy that. I do have the *next* weekend off, but then there's another show at Sierra Madre Creative Arts Group the weekend after that. Oy Vey! I'll be a wreck. But thinking of some of you who do this all summer, or all year long - traveling to far off states to sell your pretty things makes me realize how good I've actually got it. I'll wish us all tons of happy customers and fun people watching. Carpe Diem!

Wednesday, June 2, 2010

It's My Preogative

I've changed! My mind at least. I've always been a huge fan of tools you can make from things you find around your house. And I still am. There are lots of items which make wonderful textures and cutting templates that hide under the cloak of the mundane. Toothpaste caps, baby spoons, asphalt, drinking glasses, milk pop tops... I could go on.

And although I still like the theory behind using real playing cards as spacers, and still recommend them for noobies - I've gone over to the commercially manufactured dark side. I bought some slats. And love them. The colors help me to find them on my messy bench, they're calibrated to card thicknesses so I can still use my favorite measuring method and they don't warp and get funky when I spill water all over them (which I am wont to do).

I was so proud of the way I used to modify my playing cards. Take your favorite suit - hearts for instance - and use double stick tape to add the correct amount of cards to the back of a numbered card to make a permanent stack. So to the back of a 3 of hearts I would tape 2 other cards making a stack of three. Then I'd wrap the stack with packing tape and cut down the middle. Voila! Two permanent stacks of 3 card thick spacers. I made 2, 3, 4 and 5 card stacks. If I ever needed higher spacers, I could stack two of my permanent spacers together. 5 and 2 make 7.

I made loads of these stacks to use in my class kits for students to borrow. And it works really well. Except they begin to get a bit shopworn and look shabby after a while. But not in a chic way. I'll still use my homemade spacers for students, but the slats I bought to try out for my personal class kit will now be joined by another set to use at home. I guess you can teach an old blue ribbon dog a new trick or two. Who'd a thunk!

Wednesday, May 26, 2010

Gettin' Close

Last week it was all about earrings. This week I'm making all of my already fired bits and pieces into necklaces. I've had some of them sitting on my bench for years! To get ready for my show June 11, 12 and 13 I'm turning every single fired thing I have into jewelry. That or sending it to Rio to become raw materials for some other jeweler (refining scrap).

These are just some of the necklaces I've been assembling. The reticulated box is from a metals class I took at Santa Monica College two years ago. After I'm done with the assemblages, I'm hoping to have still more time to make a few new pieces. Including a larger Specimen Container to be a wowzer in the middle of my table.

Isn't this photo by Drew Davidson great?

And speaking of Specimen Container's... did you see my tutorial on Tonya's blog? I think she did a great job with the synopsis. And if you'd like to learn how to make something like it in person, come out to The Beading Place in Tustin this weekend for a two day workshop! We're gonna have so much fun. I think there are 4 or 5 spots open - so make that call and come on down.

Friday, May 21, 2010

Productivity

I've been making things for my upcoming show at the Contemporary Crafts Market (June 11-13 at the Santa Monica Civic) and I realized that I need to make a bunch of earrings. Fast. So I've given in to mass production. Not a lot of mass, but not one off's either.

I always try to stress to students that if you're using a commercial tool, you want to think of a way to make it unique to you. Use more than one texture maker on a single slab of clay, cut a shape with a cookie cutter and then cut it again with another to change the shape... Things like that. And I do it myself. But even using cookie cutters in an inventive way can take time. So I came up with the brilliant idea to make my own shape templates. Why did it take me so long to figure out that little shortcut? Doh!

I used rubber cement to glue the paper to the copper
This bench pin is great. It raises the height of the pin to what it would be if I were using a jeweler's bench instead of a desk.
I drew three designs that I liked, cut them into manageable sizes and glued them to a piece of 24g copper sheet. Then I pierced out the shape with a jeweler's saw and used them to cut multiple earring pieces.


Fired 'em up, soldered some 20g wire on to 'em, patinated, polished and put 'em together to document for you! I'm very happy! Not quite sure about the little amphora shapes, but I'll put 'em on the table and see if they get any bites. Not sure if any of them deserve to be pendants either, but I'll think on it. Loove them all as earrings. And I got so much done in two days. I might like this production thing after all.

Wednesday, May 19, 2010

The Best Laid Plans


I did get all the earrings done yesterday! Hurray! And I learned exactly why people make sketches, create production lines and basically think first.

Anyone else see Daisy Duck's feet in these earrings?

I had all the components and a vague idea of what to do with them. But reality is so different. One element that I was sure would be fabulous - wasn't. But another I hadn't even though of was! I made an earring wire design that I'd never done before and ruined some sterling wire trying to get it right. Then I got the bright idea to experiment with copper wire first. Duh.

I'm happy with these and might actually make more, now that I know how they'll turn out. But I also think I'm going to do some drawing this afternoon.

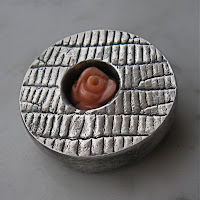
This morning I wanted to get the ring done so I can have it photographed for the Annual. One would think it would be easy. I've made a million of 'em. Okay. Slight exaggeration, but you get my drift. The hole in the coral flower was larger than 20g though, so I wasn't able to fall back on my old trick of using earring posts for the wire. This was my first time just using a simple butt end cut wire. And it was much easier than I thought. What was I afraid of before???

The only real tricky part was figuring out how to set it up. I ended up using Chris' Soldering Tool to hold the ring in place (assisted by a groove dug into my board) and a third hand to hold the wire onto the ring, which I always do with the earring post. Worked perfectly.

Later I remembered that I could have drilled a little hole in the top of the ring to fit the wire into. That might have made a better solder join. But I think this one will be fine. I set the flower onto the post with resin. I usually use 2 part epoxy, but the resin was out and I thought I'd try it. Anyone know a reason for me to take it off and set it with the epoxy instead? (edit) Well, the resin didn't cure of course. How did I think the light would get up into the hole? I re set it with 2 part, 5 minute epoxy and it's great.

Trying to solder a post into the cavity did not work! At least with this set up. I think it might have worked had I placed the piece on a trivet and torched from underneath. As it is I ended up drawing a ball on the end of the wire and the solder refused to flow.

I had the resin out to set another flower into the cavity of a bead I made as a class sample. I turned it into a brooch by soldering a wire catch and a fine silver tube to hold the pin stem. It was all going so well until after I cured the flower/uv resin I was using. I put the steel wire into the tube and tried to bend it when suddenly the tube broke in half! I think it was too short and wouldn't take the torque from the bending (steel wire is realllly hard to bend). I had also scratched the tube somehow and had polished the scratch out. Maybe I took away too much material.

Now I have to get out the Attack, remove the resin and flower, torch off the patina and re solder another tube. Ah well. Such is the life of a jewelry maker. Nothing is easy.